Step-by-Step Guide to Teaching the Leave It Command
Master the leave it command with our step-by-step dog training guide. Learn timing, treat rewards, and troubleshooting tips for reliable obedience.
Why the Leave It Command is a Lifesaver
When it comes to canine obedience, few skills are as critical for your dog's safety as the leave it command. Whether your dog is eyeing a dropped medication pill on the kitchen floor, a toxic mushroom on a hiking trail, or an aggressive dog behind a fence, a reliable leave it cue gives you immediate control over your dog's impulses. Unlike basic manners, this command is a vital behavioral conditioning tool that can literally save your dog's life.
In this comprehensive, step-by-step training guide, we will break down the mechanics of teaching leave it from scratch. By using positive reinforcement, precise timing, and a structured progression of difficulty, you can build a bulletproof cue that works in any environment.
Preparation: Tools and Treat Hierarchy
Before you begin your first training session, you need to set up your environment and gather the right rewards. According to experts at Preventive Vet, establishing a clear 'treat hierarchy' is essential for impulse control training.
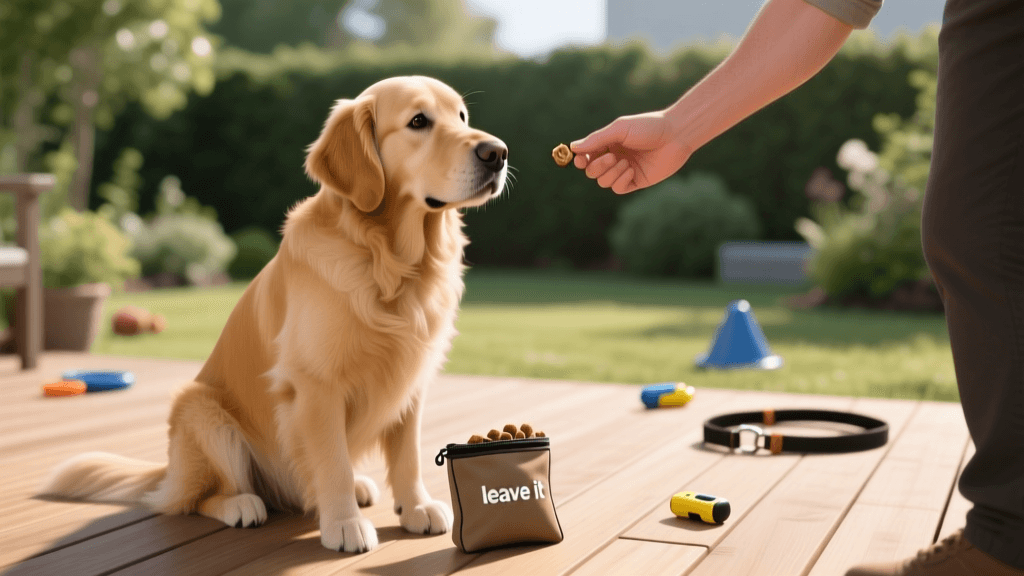
- Low-Value Treats (The Bait): Use your dog's standard daily kibble or a bland biscuit. This will be placed in your hand or on the floor as the temptation.
- High-Value Treats (The Reward): Use something incredibly enticing, such as boiled chicken breast, low-sodium string cheese, or freeze-dried liver. This is what you will feed your dog from your other hand when they succeed.
- Treat Size: Keep all treats pea-sized (about the size of a green pea). This allows for rapid repetition without overfeeding. Remember the 10% rule: treats should not exceed 10% of your dog's daily caloric intake.
- Marker: Choose a marker word like Yes! or use a mechanical clicker. Your marker must be delivered within one second of the desired behavior.
- Equipment: A standard 6-foot nylon or leather leash (no retractable leashes) and a quiet, low-distraction room.
Step 1: The Closed Fist Exercise
The goal of this first step is to teach your dog that ignoring the bait results in a better reward. Keep your training sessions short—about 5 minutes maximum—to prevent frustration.
- Place a few pieces of low-value kibble inside one hand and make a tight fist. Let your dog sniff your fist.
- Your dog will likely lick, paw, and nose at your hand. Do absolutely nothing. Do not pull your hand away, and do not say no. Simply wait.
- The exact second your dog stops trying to get the food and pulls their nose away (even just an inch), mark the behavior with your clicker or Yes!
- Immediately reward your dog with a high-value treat from your other hand. Never give them the bait from the closed fist, as this confuses the criteria.
- Repeat this process 10 to 15 times until your dog immediately stops investigating your fist and looks up at you in anticipation of the high-value reward.
Step 2: The Open Hand Challenge
Now we increase the difficulty by exposing the bait. This requires immense impulse control from your dog.
- Place the low-value kibble in your hand, but this time, leave your hand completely open and flat, like a waiter presenting a dish.
- As soon as your dog moves their nose toward the open palm, quickly close your hand into a fist to block access. (Do not use the leave it verbal cue just yet).
- Wait for your dog to back off and make eye contact with you. The moment they look away from the food and up at your face, mark with Yes! and reward from your opposite hand.
- Practice until you can keep your hand open and flat while your dog voluntarily ignores the exposed kibble and maintains eye contact with you.
Step 3: Introducing the Verbal Cue
According to the American Kennel Club, you should only introduce the verbal cue once the dog fully understands the physical mechanics of the exercise. If you say the words too early, they become meaningless background noise.
- With your open hand of low-value treats presented, say Leave it in a calm, firm tone exactly one half-second before your dog moves toward the hand.
- If they hesitate and look at you, mark and reward heavily from the other hand.
- If they lunge for the food, close your fist immediately, wait for them to settle, and try again. You may need to increase the distance between your hand and their nose.
Step 4: The Floor Drop and Leash Management
Dogs do not generalize well, so a command learned in your hand does not automatically apply to the floor. We must transition the exercise to the ground while managing their access with a leash.
- Attach your dog's 6-foot leash to their collar or harness. Step on the leash about 3 feet from the clip, giving your dog just enough slack to stand or sit comfortably, but not enough to lunge forward.
- Say Leave it and drop a piece of low-value kibble on the floor, about two feet away from your dog.
- If your dog pulls toward the treat, the leash will prevent them from reaching it. Remain completely still. Do not yank the leash; let the physical boundary do the work.
- The moment your dog stops pulling and looks back up at you, mark with Yes! and deliver a high-value treat directly to their mouth.
- Gradually increase the height from which you drop the treat, and eventually, try dropping it closer to their paws.
Step 5: Real-World Proofing
Proofing is the process of testing the command in increasingly distracting environments. A dog that obeys in the kitchen may not obey on a busy sidewalk.
- Phase A (Indoors): Walk your dog on a leash past a pile of toys or a dropped sock in the living room. Cue leave it as you approach.
- Phase B (Backyard): Practice around outdoor distractions like fallen leaves, twigs, or a stationary lawn mower.
- Phase C (Neighborhood Walks): This is the ultimate test. When walking past discarded trash, animal droppings, or food wrappers, give your leave it cue before your dog reaches the item. Reward heavily with high-value treats like real meat or cheese for compliance in high-stakes environments.
Command Comparison: Leave It vs. Drop It vs. Wait
Dog owners frequently confuse impulse control commands. Understanding the distinct differences will clarify your training criteria and prevent mixed signals. Review the table below to ensure you are using the correct cue for the situation.
| Command | Core Meaning | When to Use | Physical Action Required |
|---|---|---|---|
| Leave It | Do not touch or approach that item. | When the dog is approaching something forbidden (e.g., dropped pills, trash). | Avert gaze, move away from the item, look at the handler. |
| Drop It | Release the item from your mouth immediately. | When the dog already has something in their mouth (e.g., a stolen sock, a toxic bone). | Open jaws and release the object onto the ground or to the handler. |
| Wait | Pause your forward momentum temporarily. | At doorways, crosswalks, or before releasing them to eat from their bowl. | Stop moving forward; hold position until a release cue (like Okay!) is given. |
Troubleshooting Common Training Roadblocks
Even with a structured plan, you may encounter behavioral hurdles. Here is how to troubleshoot the most common issues:
My dog grabs the treat before I can close my hand.
This means you are moving too slowly or presenting the bait too close to their nose. Start with your hand further away, or use a clear plastic Tupperware container with a lid instead of your bare hand for the initial steps. Only remove the lid when the dog is consistently calm.
My dog only obeys when they see the high-value reward in my other hand.
You have accidentally trained your dog to look for the bribe. To fix this, hide the high-value treats in a pocket or a treat pouch behind your back. Deliver the marker word (Yes!) first, and then reach for the hidden reward. This teaches the dog that the marker predicts the reward, not the visual sight of the food.
My dog gets frustrated and barks or paws aggressively.
Impulse control is mentally exhausting. If your dog shows signs of frustration (barking, scratching, panting heavily), the session has gone on too long, or the criteria was raised too quickly. End the session immediately by tossing a few treats on the floor (a 'scatter feed') to help them decompress, and start the next session at an easier step.
Conclusion
Teaching a reliable leave it command requires patience, impeccable timing, and a willingness to progress at your dog's unique pace. By following this step-by-step framework, you are not just teaching a party trick; you are installing a vital safety mechanism that grants your dog the freedom to explore the world safely by your side. Keep your sessions short, your rewards high-value, and your expectations consistent.
priya-sutaria
All our authors care for dogs every day — read more of their work on the authors page.