DIY Dog Ramps and Stairs: Protect Your Senior Dog Joints
Learn how to build DIY dog ramps and stairs to protect your pet's joints. Step-by-step guides, material lists, and training tips for senior dogs.
The Hidden Toll of Jumping on Your Dog's Joints
Sharing your home with a dog brings endless joy, but it also comes with the responsibility of managing their physical health and environment. For many pet owners, allowing dogs to jump on and off beds, couches, and vehicles is a normal part of daily life. However, this repetitive impact can cause severe, long-term damage to your dog's musculoskeletal system. According to the American Kennel Club (AKC), breeds with long backs and short legs, such as Dachshunds and Corgis, are highly susceptible to Intervertebral Disc Disease (IVDD). The jarring impact of landing on hard floors can cause spinal discs to bulge or rupture, leading to pain, nerve damage, or even paralysis.
Even for larger, more robust breeds, the repetitive stress of jumping accelerates the wear and tear on weight-bearing joints. The American Animal Hospital Association (AAHA) notes that osteoarthritis is a degenerative joint disease that affects a significant percentage of senior dogs. By providing a gentle incline or a set of manageable steps, you can drastically reduce the daily micro-trauma your dog experiences. Building your own dog ramps and stairs is not only a cost-effective alternative to expensive pet store models, but it also allows you to customize the dimensions, traction, and aesthetics to perfectly match your home and your dog's specific mobility needs.
The Math of Mobility: Slopes, Angles, and Step Heights
Before you pick up a saw or a bottle of fabric glue, it is crucial to understand the ergonomics of canine mobility. A ramp that is too steep will intimidate your dog and put excessive strain on their hindquarters as they try to maintain grip. Conversely, stairs with steps that are too tall will force them to overextend their hips and shoulders.
Calculating the Ideal Ramp Slope
The general rule of thumb for a dog ramp is a 2:1 or 3:1 slope ratio. This means that for every one inch of vertical height (the rise), you need two to three inches of ramp length (the run). For example, if your bed is 24 inches high, your ramp should be between 48 and 72 inches long. Senior dogs, dogs recovering from surgery, or dogs with severe arthritis will require the gentler 3:1 slope.
Determining Step Height
If you prefer building stairs, the height of each step should be tailored to your dog's leg length. For small breeds like Chihuahuas or Pomeranians, step risers should be no higher than 4 to 5 inches. Medium breeds can handle 6 to 7-inch risers, while large breeds can manage 8 to 9 inches. Always ensure the treads (the flat part of the step) are deep enough for your dog to place all four paws comfortably if needed, typically at least 10 to 12 inches deep.
Foam vs. Wood: Choosing the Right DIY Approach
When deciding on your DIY build, you must consider your dog's size, your own crafting skill level, and where the ramp or stairs will live. Below is a comparison to help you choose the right path.
| Feature | High-Density Foam Stairs | Wooden Adjustable Ramp |
|---|---|---|
| Best For | Small to medium dogs, indoor use, beds and low couches | All dog sizes, vehicles, high beds, outdoor use |
| Cost to Build | $30 - $60 (Foam, adhesive, fabric) | $50 - $120 (Plywood, hinges, hardware, grip tape) |
| Difficulty Level | Beginner (No power tools required) | Intermediate (Requires saw, drill, sanding) |
| Weight Capacity | Up to 40 lbs (depending on foam density) | 150+ lbs (depending on wood thickness and bracing) |
| Portability | Lightweight, easy to move between rooms | Heavier, but can be built with folding hinges |
DIY Project 1: High-Density Foam Dog Stairs
Foam stairs are incredibly forgiving, lightweight, and safe for dogs who might slip or bump into them during the night. They are perfect for small to medium-sized dogs needing a boost onto the bed.
Materials Needed
- High-density upholstery foam blocks (at least 2 inches thick per step)
- Foam-safe spray adhesive (e.g., 3M Super 77)
- Fleece or microfiber fabric for the cover
- Hot glue gun or fabric glue
- Non-slip rug pad or rubberized shelf liner for the base
Step-by-Step Instructions
- Cut the Foam: Measure and cut your foam into rectangular blocks. If you are building a three-step staircase for a 24-inch bed, you will need three blocks. The bottom block should be 24 inches wide and 18 inches deep. The second block should be 24 inches wide and 12 inches deep. The top block should be 24 inches wide and 6 inches deep.
- Stack and Glue: Lay the largest block on the floor. Apply a generous, even coat of foam-safe spray adhesive to the top center. Carefully center the second block on top and press down firmly. Repeat the process with the third block, creating a staircase profile.
- Add Traction: Foam can be slippery. Cut strips of non-slip rug pad and glue them to the top of each step using hot glue. Alternatively, you can glue down pieces of carpet remnants or textured fleece.
- Create the Cover: Drape your fleece or microfiber fabric over the foam structure. Pull it tight and secure it underneath the bottom step using hot glue or heavy-duty fabric tape. Ensure there are no loose wrinkles that could catch your dog's claws.
- Secure the Base: Attach a piece of rubberized shelf liner to the bottom of the stairs to prevent the entire structure from sliding across hardwood floors when your dog steps on it.
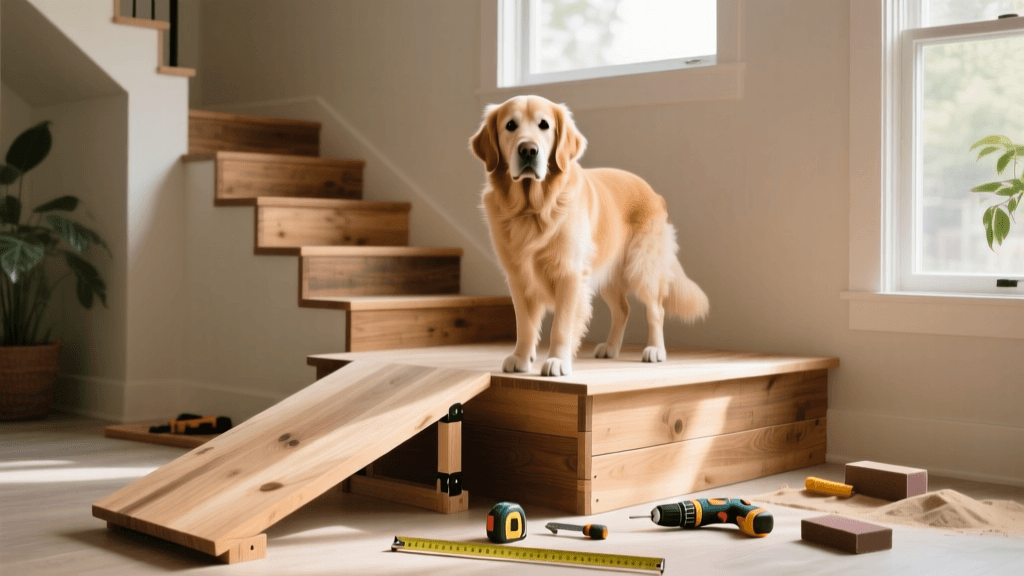
DIY Project 2: Adjustable Wooden Dog Ramp
A wooden ramp is the gold standard for larger dogs, senior dogs with severe mobility issues, or for helping your pet get into the back of an SUV. By using a piano hinge, you can make the ramp foldable for easy storage.
Materials Needed
- 1 sheet of 3/4-inch sanded plywood (cut to 24 inches wide)
- 2x4 lumber for the frame and support legs
- Piano hinge (24 inches long) and wood screws
- Heavy-duty outdoor carpet or anti-slip grip tape
- Staple gun and heavy-duty staples
Step-by-Step Instructions
- Cut the Plywood: Cut your plywood into two equal panels (e.g., 24 inches by 36 inches). This will create a 72-inch long ramp that folds in half for storage.
- Attach the Hinge: Lay the two panels flat on the ground, touching at the edges. Screw the piano hinge along the seam to connect them. Ensure the hinge bends in the direction you want the ramp to fold.
- Build the Support Frame: Cut 2x4 lumber to create a border around the edges of the plywood to give it rigidity and prevent your dog from slipping off the side. Screw these directly into the plywood. Add a horizontal 2x4 brace in the middle of each panel for extra weight support.
- Install the Traction Surface: This is the most critical step. Lay the heavy-duty outdoor carpet or grip tape over the entire surface of the ramp. Wrap the edges over the side frames and secure them tightly with the staple gun. A slippery ramp is a dangerous ramp, so ensure the texture is rough enough for dog paws.
- Add a Latch and Feet: Install a simple hook-and-eye latch on the underside to keep the ramp folded when carrying it. Attach rubber furniture feet or glue rubber matting to the bottom edges that will rest on the floor and the vehicle/bed to prevent scratching and slipping.
Training Your Dog to Use Their New Ramp or Stairs
Building the ramp is only half the battle; convincing your dog to use it is the other. Many dogs are naturally suspicious of new, unstable, or steep objects in their environment. Never force, drag, or carry your dog up the ramp, as this will only create a negative association and increase their fear.
Instead, use positive reinforcement and shaping techniques. Start with the ramp flat on the ground. Place high-value treats (like boiled chicken or freeze-dried liver) on the ramp and praise your dog for simply placing one paw on it. Gradually move the treats further up the ramp, rewarding them for walking across it while it is flat.
Once they are confident on the flat surface, introduce a very slight incline by propping one end up on a thick book or a low step. Continue the luring process. Slowly increase the angle over several days or weeks until it reaches the final height. For stairs, lure them up one step at a time, rewarding heavily at the top. Patience is key. According to veterinary behaviorists, allowing the dog to explore the equipment at their own pace builds lasting confidence and ensures they will use the ramp willingly for years to come.
Maintenance and Ongoing Safety Checks
DIY solutions require a bit more maintenance than manufactured plastic ramps. Every few weeks, inspect your wooden ramp for loose screws, splintering wood, or worn-down grip tape. If you used carpet, check for frayed edges that could catch a claw. For foam stairs, wash the fleece cover monthly to remove dirt, dander, and oils that can make the surface slick. By maintaining your DIY creations, you ensure a safe, pain-free lifestyle for your beloved companion, keeping their tail wagging and their joints healthy well into their golden years.
tom-renshaw
All our authors care for dogs every day — read more of their work on the authors page.