DIY Dog Agility Equipment: Build a Backyard Training Course
Learn how to build DIY dog agility equipment like jumps, weave poles, and tunnels. Save money and train your dog at home with these easy homemade solutions.
Introduction to Backyard Agility Training
Agility training is one of the most rewarding activities you can share with your dog. It builds confidence, strengthens the human-animal bond, and provides an excellent outlet for physical and mental energy. However, purchasing a commercial agility set can easily cost anywhere from $300 to over $1,000. For dog owners looking to introduce their pets to this exciting sport without breaking the bank, homemade solutions offer a practical, customizable, and highly effective alternative. In this comprehensive guide, we will explore how to build your own DIY dog agility equipment using readily available materials from your local hardware store.
The Financial and Practical Benefits of DIY Gear
Building your own agility course is not just about saving money; it is about tailoring the equipment to your specific dog's size, skill level, and your backyard's dimensions. Commercial sets are often bulky and difficult to store, whereas DIY PVC-based obstacles can be disassembled in minutes and stored in a standard garage or shed. Furthermore, the process of building the equipment can be a fun weekend project, and the money you save can be redirected toward high-value training treats, professional handling classes, or veterinary wellness care.
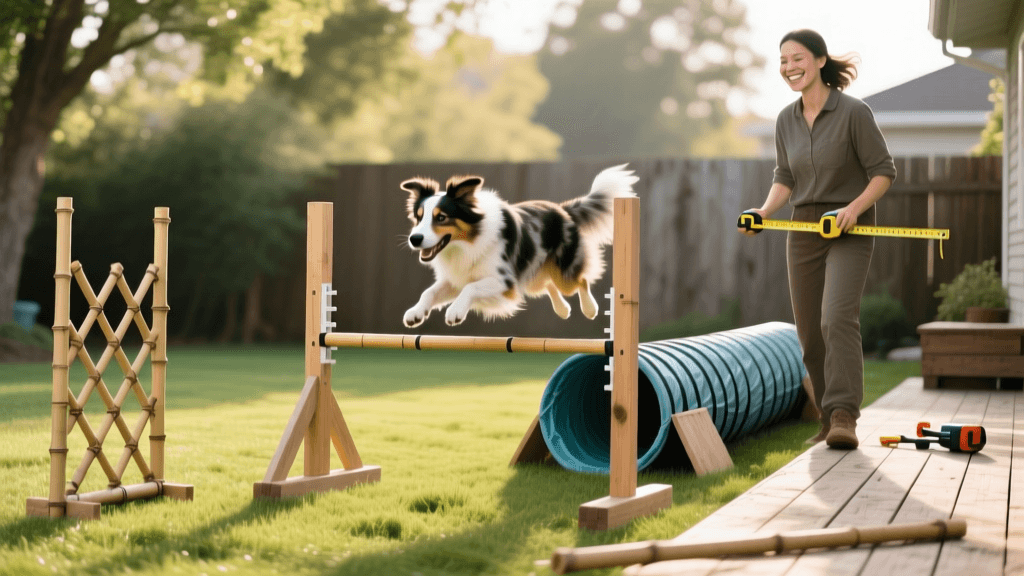
Step-by-Step Guide to Building DIY Agility Obstacles
1. The Adjustable PVC Jump Hurdle
The jump hurdle is the foundational obstacle in any agility course. To build a set of two adjustable jumps, you will need 1-inch diameter PVC pipes, T-connectors, end caps, and a lightweight wooden or PVC crossbar.
Materials and Measurements:
- Four 36-inch PVC pipes (for the uprights)
- Four 12-inch PVC pipes (for the base feet)
- Four PVC T-connectors
- Four PVC end caps
- One 48-inch lightweight wooden dowel or thin PVC pipe for the crossbar
Assembly Instructions:
Attach the T-connectors to the bottom of the 36-inch uprights. Insert the 12-inch pipes into the sides of the T-connectors to create a stable, T-shaped base. Place end caps on the feet to prevent the pipes from sinking into soft grass. To make the jump adjustable, drill holes every 4 inches up the uprights and use bungee cords or specialized PVC jump cups to hold the crossbar. If your dog knocks the bar down, the lightweight dowel will fall safely without causing injury. The total cost for this setup is approximately $25.
2. Homemade Weave Poles with Weighted Bases
Weave poles require precision and are notoriously challenging for dogs to master. According to official American Kennel Club (AKC) agility guidelines, standard weave poles must be spaced exactly 24 inches apart.
Materials and Measurements:
- Six 40-inch lengths of 3/4-inch PVC pipe
- Six small plastic buckets or plant pots
- Two bags of quick-setting concrete (Quikrete)
- Measuring tape and spray paint
Assembly Instructions:
Mix the concrete and pour it into the small buckets, filling them about halfway to create heavy, stable bases. Before the concrete sets, insert one 40-inch PVC pipe into the center of each bucket so it stands perfectly straight. Once cured, you have six weighted weave poles. Use a measuring tape to mark your lawn or training surface with spray paint, placing a dot exactly every 24 inches in a straight line. Place your concrete bases over the dots. This DIY method costs around $40 and provides the heavy bases necessary to prevent the poles from tipping over when your dog brushes against them at high speeds.
3. The DIY Collapsible Fabric Tunnel
Tunnels are a favorite among dogs, providing a thrilling sensory experience. While commercial tunnels are made of heavy-duty nylon, you can create a highly effective training tunnel using flexible landscaping drainage pipe or by repurposing pop-up fabric laundry hampers.
Materials and Measurements:
- One 10-foot length of 24-inch diameter flexible corrugated drainage pipe (available at home improvement stores)
- Heavy-duty duct tape
- Landscaping U-pins or sandbags for anchoring
Assembly Instructions:
Unroll the flexible drainage pipe and use heavy-duty duct tape to secure any sharp edges or seams on the interior to protect your dog's paws and coat. Because the pipe is naturally flexible, you can curve it slightly to teach your dog to follow the bend. Anchor the tunnel to the ground using landscaping U-pins pushed through pre-drilled holes in the top ridges, or weigh it down with sandbags. This rugged, weather-resistant tunnel costs roughly $35 and can be left outside year-round.
DIY Agility Equipment Cost and Materials Table
| Obstacle Type | Primary Materials Needed | Estimated DIY Cost | Build Time |
|---|---|---|---|
| Adjustable Jump Hurdle (Set of 2) | 1-inch PVC, T-connectors, wooden dowel | $25.00 | 1 Hour |
| Weave Poles (Set of 6) | 3/4-inch PVC, buckets, quick-set concrete | $40.00 | 2 Hours + Drying |
| Flexible Training Tunnel | 24-inch corrugated drainage pipe, duct tape | $35.00 | 30 Minutes |
| Pause Table (Platform) | Plywood, 4x4 wooden posts, outdoor carpet | $45.00 | 2 Hours |
Safety First: Preparing Your Training Environment
When utilizing homemade solutions, safety must remain your top priority. The ASPCA emphasizes that safe exercise environments are critical to preventing orthopedic injuries in active dogs. Always set up your DIY agility course on a forgiving surface such as flat, well-maintained grass or specialized rubber agility mats. Avoid setting up jumps or weave poles on concrete, asphalt, or slippery wooden decks, as the high-speed turns and landings can cause severe joint trauma or paw pad abrasions.
Additionally, inspect your PVC equipment before every training session. Look for micro-fractures in the plastic, splinters on wooden crossbars, or exposed concrete rebar. Sand down any rough edges and ensure all bases are weighted adequately so the equipment does not collapse under your dog's weight. Always begin with a 5-to-10-minute warm-up consisting of brisk walking and gentle stretching to prepare your dog's muscles and joints for the physical demands of agility.
Training Techniques for Homemade Equipment
Training on DIY equipment follows the exact same behavioral conditioning principles as professional classes. The key is positive reinforcement, patience, and keeping sessions incredibly short. According to the American Kennel Club, agility should be introduced as a fun game rather than a rigid obedience drill. Keep your training sessions to a maximum of 10 to 15 minutes to prevent physical fatigue and mental burnout.
The Shaping Method for Jumps:
Start with the crossbar resting directly on the grass. Lure your dog over the bar using a high-value treat, such as boiled chicken or freeze-dried liver, and mark the behavior with a clicker or a verbal "Yes!" the moment they step over it. Gradually raise the bar by 2-inch increments only when your dog is confidently clearing the current height. Never force a dog over a jump, as this can create a lasting fear of the obstacle.
The Channel Method for Weave Poles:
Weaving is an unnatural movement for dogs and requires extensive conditioning. Begin by offsetting your DIY weave poles slightly to create a wide "channel" down the middle. Run through the channel with your dog, rewarding them heavily at the exit. Over the course of several weeks, gradually push the poles closer together into a straight line until the dog is physically weaving through the 24-inch spaced poles.
Establishing a Routine and Tracking Progress
Consistency is the cornerstone of behavioral conditioning. Dedicate two to three short sessions per week to your backyard agility course. Keep a training journal to track which obstacles your dog finds challenging, their preferred reward motivators, and their physical endurance levels. By combining these cost-effective DIY homemade solutions with structured, positive reinforcement training, you will cultivate a confident, athletic, and deeply bonded canine companion ready to tackle any obstacle in their path.
aaron-whyte
All our authors care for dogs every day — read more of their work on the authors page.