DIY Dog Agility Equipment: Build Your Backyard Course
Learn how to build safe, affordable DIY dog agility equipment. Step-by-step guides for jumps, weave poles, and tunnels for backyard training.
Why Build Your Own Dog Agility Course?
Dog agility is one of the most exhilarating and rewarding sports you can share with your canine companion. It builds confidence, burns off excess energy, and strengthens the bond between you and your dog. However, purchasing a full set of commercial agility equipment can easily cost upwards of $500 to $1,000. For pet owners who want to introduce their dogs to the sport without breaking the bank, DIY and homemade solutions offer a fantastic alternative. By building your own backyard agility course, you can customize the equipment to your dog's size, skill level, and your available space. According to the American Kennel Club (AKC) Agility Guidelines, agility is suitable for almost all breeds and mixed breeds, provided the equipment is safe and appropriately scaled. In this comprehensive guide, we will walk you through practical, step-by-step instructions for building three essential agility obstacles: jump hurdles, weave poles, and a collapsible tunnel, complete with exact measurements, material costs, and training tips.
Essential Safety Rules for DIY Agility Gear
Before you head to the hardware store, it is crucial to establish some ground rules for homemade equipment. Commercial gear is rigorously tested for stability and safety, so your DIY builds must mimic these standards to prevent injury.
- Stability is Paramount: Equipment should not tip over easily if your dog bumps into it. Use wide bases for jumps and secure weave poles firmly into the ground or heavy bases.
- Sand All Edges: When cutting PVC or wood, microscopic splinters and sharp plastic burrs are left behind. Always sand down every cut edge to protect your dog's paws and skin.
- Use Breakaway or Lightweight Bars: Jump bars should be lightweight (like foam or thin PVC) so they fall easily if your dog misjudges a jump, preventing leg injuries.
- Check the Footing: Never set up your DIY course on slippery surfaces like concrete or wet tile. Always train on short grass, dirt, or specialized rubber matting to prevent ligament tears.
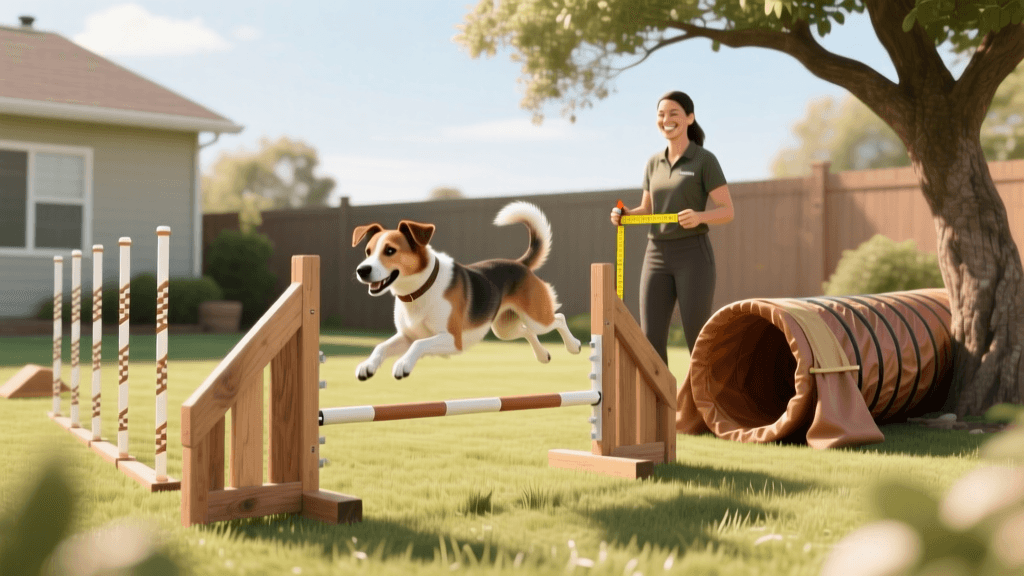
Project 1: The Classic PVC Jump Hurdle
The jump hurdle is the foundational obstacle in any agility course. PVC pipe is the gold standard for DIY agility gear because it is lightweight, weather-resistant, inexpensive, and easy to cut.
Materials and Tools Needed
- 1-inch diameter PVC pipe (approx. 20 feet total)
- Four 1-inch PVC T-joints
- Four 1-inch PVC elbow joints
- Two 1-inch PVC end caps
- PVC cutter or hacksaw
- Measuring tape and sandpaper
- Pool noodles (for the jump bar)
Step-by-Step Assembly
1. Cut the Uprights and Base: Cut four pieces of PVC to 36 inches (these will be your vertical uprights). Cut four pieces to 18 inches (for the base feet) and two pieces to 24 inches (for the base stabilizers).
2. Build the Base: Attach the 18-inch pieces to the T-joints to form an 'L' shape. Connect the 24-inch stabilizer to the other side of the T-joint. This creates a wide, stable footprint that prevents tipping.
3. Attach the Uprights: Insert the 36-inch uprights into the top of the T-joints. Do not use PVC cement; leaving them friction-fitted allows you to disassemble the course for storage or transport.
4. Create the Jump Bar Rests: Drill small holes through the uprights every 4 inches, starting from the bottom. You can insert small wooden dowels or heavy-duty zip ties through these holes to act as pegs to hold the jump bar.
5. The Breakaway Bar: Cut a pool noodle to the desired width (usually 48 inches for medium/large dogs) and slide it over a thin wooden dowel or a lightweight PVC pipe. The foam ensures that if your dog clips the bar, it falls safely without causing injury.
Estimated Cost: $25 - $35 per jump set.
Project 2: Spaced Garden Stake Weave Poles
Weave poles are notoriously the most difficult obstacle for dogs to master, requiring immense concentration and physical flexibility. While competition-grade weave poles feature complex spring-loaded bases, you can create an effective training set using heavy-duty garden stakes or wooden dowels.
Materials and Measurements
According to standard agility regulations, weave poles must be spaced exactly 24 inches apart. For a beginner set, 6 poles are sufficient; advanced dogs require 12.
- Six to twelve 48-inch heavy-duty wooden garden stakes or 3/4-inch PVC pipes
- Measuring tape
- Hammer or rubber mallet
- Brightly colored duct tape
Step-by-Step Assembly
1. Mark the Spacing: Lay out a long measuring tape in a straight line across your yard. Mark a spot exactly every 24 inches. Precision here is critical; inconsistent spacing will confuse your dog's muscle memory.
2. Install the Poles: Drive the garden stakes into the ground at each mark, leaving about 36 to 40 inches above the soil. If using PVC, you will need to hammer rebar into the ground and slide the PVC over the rebar for stability.
3. Add Visual Cues: Wrap alternating colors of duct tape around the poles. Dogs do not see the full color spectrum, but high-contrast tape (like black and yellow) helps them distinguish the poles from the background grass.
Estimated Cost: $15 - $25 for a 6-pole set.
Project 3: The Landscaping Pipe Tunnel
Tunnels build confidence and speed. While competition tunnels are made of heavy-duty canvas with metal springs, a DIY landscaping pipe tunnel is a brilliant, cheap alternative for backyard conditioning.
Materials Needed
- 10-foot flexible corrugated landscaping drain pipe (solid, not slotted)
- Heavy-duty duct tape
- Sandbags or U-shaped garden staples
Step-by-Step Assembly
1. Inspect the Interior: Run a towel through the inside of the landscaping pipe to ensure there are no sharp plastic burrs from the manufacturing process that could scrape your dog's back.
2. Secure the Tunnel: Lay the pipe in a gentle curve or straight line. Use U-shaped garden staples to pin the tunnel to the grass every 2 feet. This prevents the tunnel from rolling or collapsing when your dog charges through it.
3. Anchor the Ends: Place sandbags over the entrance and exit rings to keep the tunnel openings wide and stable. A collapsing entrance can terrify a novice agility dog.
Estimated Cost: $20 - $30.
Cost Comparison: Commercial vs. DIY Agility Equipment
Below is a structured comparison chart illustrating the financial and time investments required for both commercial and homemade agility gear.
| Equipment Type | Commercial Cost (Average) | DIY Cost (Average) | Build Time | Durability & Weather Resistance |
|---|---|---|---|---|
| Jump Hurdles (Set of 3) | $150 - $250 | $35 - $45 | 1.5 Hours | High (PVC is weatherproof) |
| Weave Poles (Set of 6) | $80 - $120 | $15 - $25 | 30 Minutes | Medium (Wood may rot over years) |
| Agility Tunnel (10 ft) | $100 - $180 | $20 - $30 | 15 Minutes | Medium (Plastic degrades in UV) |
| Total Estimated Cost | $330 - $550 | $70 - $100 | ~2 Hours | Excellent Value |
How to Train Your Dog on Homemade Obstacles
Building the equipment is only half the battle; teaching your dog to navigate it safely is where the real work begins. The Humane Society of the United States strongly advocates for positive reinforcement and reward-based training methods, which are especially critical in high-drive sports like agility.
1. Shaping and Luring
Start with the obstacles at their lowest, easiest settings. For the jump, place the bar directly on the ground. Use a high-value treat, such as freeze-dried liver or boiled chicken, to lure your dog over the bar. Say a cue word like 'Jump' or 'Over' as they cross the threshold, then immediately reward them on the other side. Never force or physically push your dog over an obstacle, as this creates fear and avoidance.
2. The Weave Pole 'Channel' Method
Teaching weaves requires patience. Do not expect your dog to naturally weave. Start by offsetting your DIY stakes to create a wide 'channel' or V-shape. Lure your dog straight down the middle of the channel. As they master running through the center, gradually push the stakes closer to the 24-inch center line over several weeks. This builds the physical muscle memory without causing spinal strain.
3. Tunnel Confidence Building
For the tunnel, start by scrunching the landscaping pipe up so it is only 2 or 3 feet long. Have a helper hold your dog at the entrance while you stand at the exit, calling them excitedly and showing a favorite toy. As they shoot through, throw a 'reward party' with treats and praise. Gradually extend the tunnel to its full 10-foot length as their confidence grows.
Final Thoughts on DIY Agility Training
Creating your own dog agility course is a deeply satisfying weekend project that yields incredible benefits for your dog's physical health and mental stimulation. By utilizing affordable materials like PVC pipe, landscaping drain tile, and garden stakes, you can replicate the core mechanics of professional agility gear for a fraction of the cost. Remember that the goal of backyard agility is not necessarily to prepare for the Olympics, but to foster joy, communication, and teamwork between you and your dog. Always prioritize safety, keep your training sessions short (10 to 15 minutes maximum to prevent fatigue and frustration), and celebrate every small victory. With your homemade course and a pocket full of treats, you and your dog are ready to conquer the backyard, one obstacle at a time.
jonas-cole
All our authors care for dogs every day — read more of their work on the authors page.