DIY Backyard Agility Course: Build Training Gear at Home
Build a DIY backyard agility course on a budget. Discover step-by-step instructions, PVC material costs, and expert training tips for homemade obstacles.
Why Build a DIY Backyard Agility Course?
Agility training is one of the most rewarding forms of behavioral conditioning, physical exercise, and trick teaching you can share with your dog. It builds confidence, strengthens the bond between handler and pet, and provides essential mental stimulation. However, purchasing a full set of commercial agility equipment can easily cost upwards of a thousand dollars. For hobbyists, beginners, or those simply looking to enrich their dog's backyard experience, building DIY agility equipment is a highly effective, budget-friendly alternative. By utilizing easily accessible hardware store materials like PVC piping and plywood, you can create a safe, customizable training environment right at home. This guide will walk you through the exact measurements, material costs, and training methodologies required to construct and utilize your own homemade agility course.
Ground Surface and Safety Preparation
Before you cut a single piece of PVC or hammer a nail, you must evaluate your training surface. Dogs exert tremendous force on their joints when landing jumps or weaving at high speeds. According to veterinary sports medicine experts, training on slippery or overly hard surfaces can lead to severe orthopedic injuries, including cranial cruciate ligament tears. The ideal DIY agility surface is flat, well-draining, and provides adequate traction. Short-cut grass, flat dirt, or specialized artificial turf designed for pets are excellent choices. Avoid concrete, asphalt, and gravel entirely. Furthermore, ensure your backyard is completely clear of hidden holes, rocks, or toxic plants. Safety is the foundational pillar of all successful behavioral conditioning.
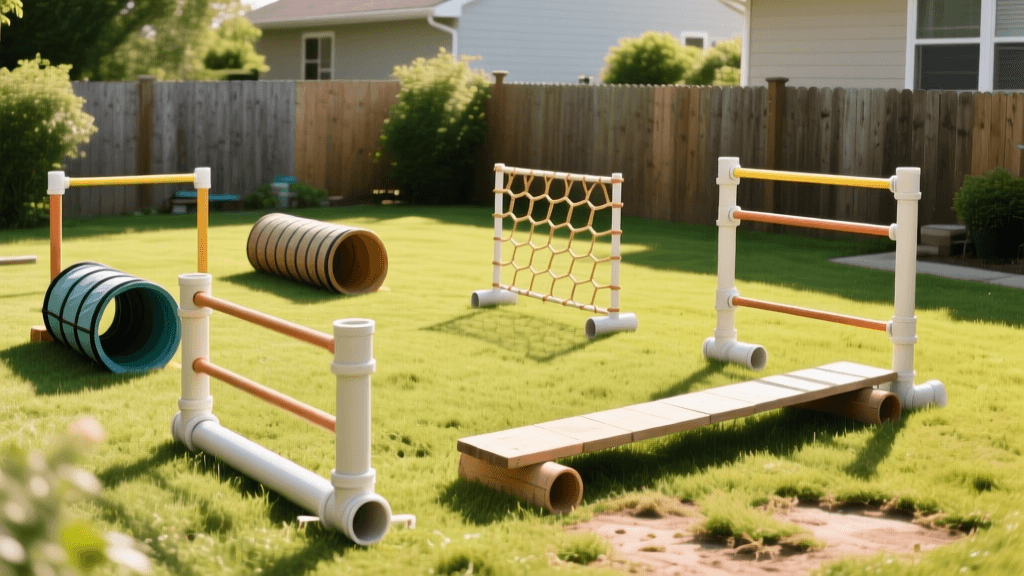
Project 1: The DIY PVC Agility Jump
The standard agility jump is the most frequently used obstacle in any course. Building a jump that is easily adjustable allows you to accommodate your dog's growth, skill level, and specific breed requirements. According to the American Kennel Club (AKC), jump heights are categorized by the dog's height at the withers, ranging from 8 inches for small breeds up to 24 inches for large, athletic breeds. A DIY PVC jump allows you to create adjustable jump cups to meet these exact standards.
Materials Needed
- Four 10-foot lengths of 3/4-inch Schedule 40 PVC pipe
- Four PVC T-fittings (3/4-inch)
- Four PVC end caps (3/4-inch)
- Four PVC 90-degree elbow joints (3/4-inch)
- One 36-inch wooden dowel (1-inch diameter) for the jump bar
- PVC cement (optional, but recommended for the base)
- Zip ties or specialized PVC jump clips
Step-by-Step Assembly
- Cut the Base: Cut two pieces of PVC to 36 inches each. These will serve as the feet of your jump. Attach an end cap to one side of each foot, and a T-fitting to the other side.
- Cut the Uprights: Cut two pieces of PVC to 40 inches each. Insert these into the upward-facing opening of the T-fittings on your base.
- Add the Stabilizers: Cut two more pieces of PVC to 18 inches. Attach a 90-degree elbow to one end of each, and insert the other end into the remaining open side of the T-fittings. This creates a stable, triangular base that prevents the jump from tipping over when your dog knocks the bar.
- Create the Jump Cups: Use heavy-duty zip ties to attach small plastic hooks or specialized PVC jump clips to the uprights at 4-inch intervals (8, 12, 16, 20, and 24 inches). Rest your wooden dowel across these cups. If your dog knocks the bar, it will fall safely to the ground without pulling the entire structure down.
Project 2: Homemade Weave Poles
Weave poles are notoriously difficult for dogs to master and require extensive behavioral conditioning. The Fédération Cynologique Internationale (FCI) mandates that standard weave poles must be spaced exactly 60 centimeters (approximately 24 inches) apart. Replicating this precise spacing at home is crucial for building proper muscle memory.
Materials Needed
- Six to twelve 40-inch lengths of 3/4-inch Schedule 40 PVC pipe
- One 10-foot length of 1-inch PVC pipe (for the base spine)
- PVC T-fittings spaced exactly 24 inches apart
- Rebar stakes (for outdoor ground stability)
Step-by-Step Assembly
- Prepare the Spine: Take your 1-inch PVC spine and attach T-fittings every 24 inches. Ensure the T-fittings are perfectly aligned in a straight line.
- Insert the Poles: Insert your 40-inch, 3/4-inch PVC poles into the upward-facing T-fittings. Do not use PVC cement here; you want the poles to have a slight amount of flex so they do not injure your dog if they make a mistake and hit a pole with their shoulder.
- Ground Anchoring: If training outside, drill small holes through the bottom of the 1-inch spine and use rebar stakes to anchor the base firmly into the grass. This prevents the poles from shifting during high-speed entries.
Project 3: The DIY Pause Table
The pause table requires your dog to jump onto a raised, stable surface and hold a sit or down position for a designated time, usually five seconds. This obstacle is phenomenal for teaching impulse control and obedience amidst high distraction.
Materials and Assembly
To build a pause table, purchase a sturdy, pre-made wooden stool or coffee table from a thrift store, or construct a simple 36-inch by 36-inch box using 3/4-inch plywood. The table must be heavy enough that it will not tip or slide when a 70-pound dog leaps onto it. Cover the top surface with a piece of yoga mat or outdoor carpeting, secured with heavy-duty staples, to provide slip-resistant traction. For small dogs, the table should be 8 inches high; for medium to large dogs, aim for 12 to 16 inches. Always sand down any rough wooden edges to prevent splinters.
Cost Comparison: DIY vs. Commercial Gear
One of the most compelling reasons to embrace homemade solutions for dog training is the massive financial savings. Below is a breakdown comparing the costs of our DIY builds against entry-level commercial equipment.
| Obstacle | DIY Material Cost | Commercial Cost | Build Time |
|---|---|---|---|
| Adjustable Agility Jump | $12 - $18 | $80 - $150 | 30 Minutes |
| 6-Pole Weave Set | $25 - $35 | $150 - $250 | 1 Hour |
| Pause Table | $20 - $30 | $100 - $180 | 45 Minutes |
| Total Estimated Cost | $57 - $83 | $330 - $580 | Under 3 Hours |
Training Progression and Behavioral Conditioning
Having the equipment is only half the battle; teaching your dog how to interact with it safely requires patience, positive reinforcement, and structured behavioral conditioning. Research published in the National Center for Biotechnology Information (NCBI) highlights that environmental enrichment and structured problem-solving tasks significantly reduce anxiety and destructive behaviors in domestic dogs. Agility training serves as a premier form of this cognitive enrichment.
Conditioning the Jump
Never force your dog over a jump. Start with the bar resting directly on the ground. Use a high-value treat, such as boiled chicken or freeze-dried liver, to lure your dog over the bar. As they cross, use a marker word like 'Yes!' or a clicker, and reward them heavily on the other side. Gradually raise the bar by 2-inch increments over several weeks. Only increase the height when your dog is confidently and safely clearing the current height without knocking the bar.
The 2x2 Method for Weave Poles
The most effective way to teach weave poles at home is the 2x2 method. Instead of forcing the dog through a long line of poles, start with just two poles. Position yourself at a 45-degree angle to the poles and reward your dog for passing through the gap. Once they master the entry, add two more poles (making four) and repeat the process. This method builds a deep, cognitive understanding of the weave entry rather than relying on physical manipulation, which can cause fear or avoidance.
Mastering the Pause Table
Teach the pause table using your existing obedience commands. Lure your dog onto the table and ask for a 'sit' or 'down'. Initially, reward them immediately for getting onto the surface. Gradually increase the duration they must hold the position before receiving the treat, working your way up to the standard five-second count. If your dog breaks the position, calmly guide them back to the table and restart the count. This builds immense impulse control.
Always prioritize your dog's physical safety and mental well-being. Keep DIY training sessions under 15 minutes to prevent fatigue and frustration, ending on a positive note with a high-value reward and a favorite game of tug.
Conclusion
Building a DIY backyard agility course is a deeply satisfying project that yields incredible benefits for your dog's physical health and mental sharpness. By utilizing affordable materials like PVC pipe and plywood, you can replicate professional-grade training environments for a fraction of the cost. Remember that the true value of agility lies not in the speed of the run, but in the communication, trust, and joy shared between you and your dog. Grab your tape measure, head to the hardware store, and start building your homemade training sanctuary today.
marcus-aldridge
All our authors care for dogs every day — read more of their work on the authors page.